A Step By Step Guide to Finding Your Water Leaks
This guide will take you through the steps to check your home for leaks. Start with Part 1 and work your way through to Part 4. If you find and fix a leak make sure you still go through the remaining parts. We have seen leaks from different sources at the same time. Remember, this is only a guide and should not take the place of calling a plumber when one is needed.
Part 1: Is your water use above average?
Many times high water bills will indicate a leak, but this is not always the case. Before you start looking for a leak, determine how many gallons each person used this month compared to the last few months. The number of days in the billing cycle may change each month increasing the total bill, but not the average use. Divide the number of gallons used on your bill by the number of people in your household. Compare the gallons used per person per day on your last 2-3 bills; take into account any visitors or habit changes. If the number this month is noticeably higher than last you may have a leak.
Tip: Although estimates vary, according to the USGS the average household uses approximately 80 to 100 gallons of water per person per day.
Here are two websites to help you with your water use calculations:
Part 2: Find a leak inside the home:
Leaks can occur in many different places around the home, making them hard to find. If you find a leak, there are many do-it-yourself videos online that can show you how to fix most problems. Once again, if you do not feel confident in fixing the problem yourself, call a plumber.
Step 1: Turn off any water being used in the home, get a notebook, pen and a flashlight.
As you go through Steps 2 – 4 write down if you see any leaks or obvious signs of water. This will allow you to find all of your hidden leaks at once and come back to fix them later.
Step 2: Basement or Crawl Space
Start in the lowest level of your home and look for any leaking pipes or water that has pooled on the ground. If everything is turned off in your home, no water should be moving through any pipes. Listen for sounds of running water. If you hear water, try to track where the pipe goes. Make note of any potential problems in your notebook.
Pay attention to where the cutoff valve is to your home; usually located where the service line enters the home. If you have to make repairs to any pipes, you will need to know where to shut off the water. If you do not know where the cutoff valve is or you do not have a customer cutoff valve please contact the City to have the City valve shutoff.
Step 3: Main Level(s): Walk through every room and look for:
Pipes: Look for pipes leaking under sinks as well as any wet or stained carpet, walls and ceilings. These usually indicate leaking pipes or a leaky roof. Either problem can cause damage to the structure of your home and create mold and mildew.
Faucets: Write down if you have any leaking faucets. These are usually easy to fix and many times just need a washer replaced. These small leaks will add up over time.
Tip: If a faucet or pipe drips 1 drop per second it will waste 2,700 gallons of water a year!
Hot Water Heater: The pressure relief valve allows the hot water heater to drain water if the pressure becomes too great. However, many times this valve is directly connected to a drain making it difficult to see the problem. Without touching your pressure relief valve, listen for water flowing through any connected hoses or look at the end of the hose for running water. If you have a leak, which needs to be repaired, speak to a certified hot water heater specialist.
Tip: Water heaters can leak intermittently, so make sure you check multiple times
CAUTION! Water heaters are dangerous, never attempt to fix them yourself.
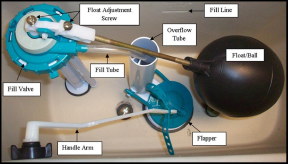
Step 4: Toilets– the number one hidden leak
- Test 1: Obvious Leaks: Take the cover off the tank. Watch to see if there is any water dripping or running into the overflow tube. If water is flowing into the overflow tube, start by adjusting the height of the float. If water is dripping out of the fill valve you may need to tighten a screw or replace it.
- Test 2: Silent Leaks: Place a few drops of food coloring or dye tablets into the tank of the toilet. DO NOT flush for one hour. After the hour if there is food coloring in the toilet bowl, there is a leak, move onto Test 3. If there is no food coloring in the bowl, you do not have a leak, move onto Part 3.
- Test 3: Determine What Part is Leaking: Turn off the water supply at the base of the toilet. Draw a line on the tank at the water level. Wait another hour. If the water level drops below the line, the problem is the flush valve or flapper. If the water level stays the same, the leak is at the refill valve or float.
Tip: Food coloring will enter the bowl once you flush, this is normal and does not indicate a leak.
Part 3: Finding a leak outside:
Spigots: Over time, these can start to drip from the nozzle or where the spigot meets the house. Check all of your spigots by looking for leaks as well as listening for running water in the pipe.
Service Line and Irrigation System Leaks: Look for soft or muddy areas as well as any patches of grass that seem greener than other areas. A common misconception is that if there is a leak in an underground pipe there will always be a pool of water or the ground will be soft. This is not always the case. Large leaks can occur with no obvious signs on the surface of the ground. Leaks in the service line frequently happen where the pipe meets the house because the foundation restricts movement in this area when the ground freezes, however, leaks can occur anywhere.
If you suspect that you have a leak in your water line between the meter and your house you can try to find the location of the leak before you call a plumber. This can significantly cut down on labor costs, however, be careful not to hit or puncture any buried utility lines.
CAUTION! Underground power lines are very dangerous and PVC pipes can easily be punctured making leaks worse. Call 811 two working days prior to your planned start date to find out where lines are buried before you start probing or digging.
Tip: If you think your leak is not worth fixing remember a small 7-15 gallon an hour leak (2-4 cups a minute) can waste 5,000 to 10,000 gallons a month. This can significantly impact your water bill.
Part 4: Water conservation tips around the home:
Save water by using a Rain Barrel to water your plants and contact one of our local nurseries to learn more about water efficient gardening.
Replace old toilets. If a family of four replace one 3.5 gallon per flush (gpf) toilet with a 1.28 gpf toilet they can save around 35 gallons of water a day or 12,775 gallons a year.
Turn off the water while you are brushing your teeth or shaving and save 3-4 gallons each time.
Change faucet aerators to 1 gallon per minute and showerheads to 1.75 gallon per minute flows and save every time you shower or use your sink.
Only run the dish or clothes washer when it is full.
Attach a nozzle to your garden hose when washing the car. That will keep water from running continuously until you’re ready to rinse.
For further information check out the Water Conservation page.
Tip: If you choose to read your own meter please remove the meter lid carefully or you may damage the wiring to the radio transmitter. Remove the lid slowly and lay the lid to the side of the meter, making certain not to harm any of the components.
Note: The City of Mt. Shasta is not responsible for any damage caused by following these instructions. If you are unable to find or fix the problem on your own please contact your local plumber.